Overview of Acxite navigation
As part of the Acxite user experience design, we aimed to make the application user-friendly and intuitive. That required a balance between simplicity and easy availability of the right tools and options to the users. This article discusses the User Interface (UI) objects and how to access various app features.
The Acxite application has three main objects that determine the access and data that you see:
– Organisation (Practice or Account): This is the top-level entity where billing and subscription settings are managed. When you sign up and add your first business, an organisation is automatically created in the background. You can manage multiple clients or businesses under an organisation.
– Business: A business, person, organisation, or entrepreneur, for whom accounting is being performed. An organisation can have multiple businesses. Accountants and bookkeepers typically establish a business entity for each of their clients. Some users use this feature to keep personal and business expenses separate, or to manage expenses of different branches or locations separately.
– User: A user account, associated with an email used for login. A user can have access to multiple organisations or businesses.
Navigating the Acxite Interface
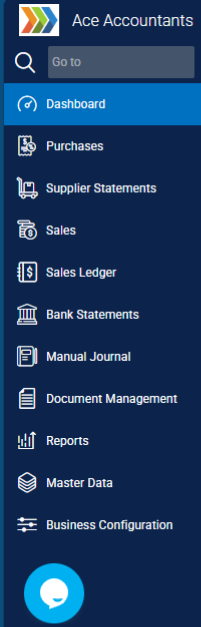
In Acxite, you can easily manage documents, users, and settings with a layout that clearly separates each section. Here’s a breakdown of the main navigation elements visible:
Business Menu (Left Side)
Located on the left-hand side, the Business Menu provides access to all features related to the current business. You will see the following options:
– Organisation Logo and Name: Here you see the logo and name of your organisation (Practice). Useful for accountants, as it reinforces your brand to clients.
– Dashboard: It provides a visual summary of your recent activity, including uploaded files and monthly transaction trends. Please refer to the following article for details: Overview of Business Dashboard.
– Purchases: Upload and manage supplier invoices, bills and receipts. View processed data and export to your accounting software. For more details, please refer to the following article for details: Overview of the Purchases.
– Sales: Upload and track customer invoices or other income records. Please refer to the following article for details: Overview of the Sales.
– Bank Statements: Upload and extract data from PDF bank statements for reconciliation and reporting. Please refer to the following article for details: Overview of Bank Statements.
– Document Management: Access and manage all uploaded documents, including receipts, invoices, and statements, in one centralised location. You can also review deleted documents or manage other documents that do not meet the criteria for the above modules.
– Reports: Generate reports for purchases, sales, and other financial data. Please refer to the following article for details: Overview of Reports in Acxite.
– VAT Summary: Generate a summary of GST/VAT incurred or received based on the scanned bills, receipts and sales invoices. Please refer to the following article for details: Overview of VAT Summary.
– Master Data: Maintain lists of contacts, accounts, tax rates, and other reusable data required for transaction creation. Please refer to the following article for details: Understanding the use of Master Data.
– Business Configuration: Edit business details, invite users, manage modules, and define extraction rules.
– Chat Support: You can reach out to the Acxite customer chat support by clicking the chat bubble at the bottom left.
Title Bar (Top Side)
The Title Bar is located at the very top of the screen and provides quick access to global functions like business switch, document search, notifications, and account management, which are available from anywhere within the application.
Business List: The business name is shown at the top. When you click the business name, it opens the list of businesses, and you can quickly switch between different clients.